NOTE:
Caterpillar ET 2025A & 2019C Electronic Technician Diagnostic Software Download and Installation
Keep all parts clean and free of foreign matter.
Fountains will cause rapid wear and shorten component life.
Assembly steps:
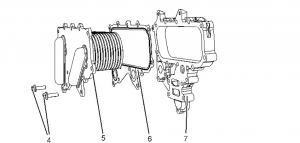
1. Make sure the cooler base (5) is clean, not clogged or damaged. Make sure the bulkhead (7) is clean and not damaged. Replace any damaged parts.
2. Place the new fitting (6) on the bulkhead (7). Install the cooler base (5) onto the bulkhead.
CAT Comm Adapter 3 478-0235 Diagnostics for Caterpillar
3. Install and tighten the bolts (4) by hand.
Installation steps
1. Clean the cylinder block gasket surface.
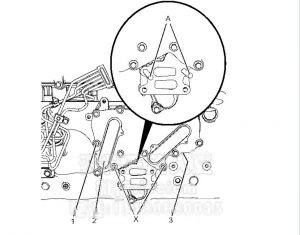
2. Position the new gasket (3) (not shown) onto the engine oil cooler assembly (2). Install the bolts (1) into the serrated holes in the gasket.
NOTE: Make sure the different length bolts are installed in the correct position.
3. Install Tooling (A) onto the cylinder block.
4. Install the oil cooler assembly (2) onto Tooling (A). Make sure the oil cooler assembly is properly seated in the groove in the cylinder block.
5. Tighten the bolts (1) by hand.
6. Remove Tooling (A).
7. Install the remaining bolts (1) onto the engine oil cooler assembly (2).
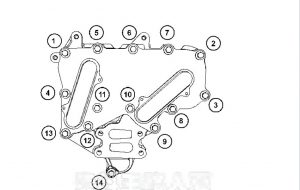
8. Tighten the bolts (1) in the sequence shown in Figure 3 to a torque of 22 N·m (195 lb in).
9. Install the oil filter base. Refer to Disassembly and Assembly, "Oil Filter Base - Remove and Install" for the correct procedure.
10. Fill the cooling system to the correct level. Refer to the Operation and Maintenance Manual, "Cooling System Coolant - Change" for the correct procedure. https://127.0.0.1/sisweb/sisweb/techdoc/techdoc_print_page.jsp?returnurl=/sis... Friday, October 26, 2018
11. Check the engine oil level. Refer to the Operation and Maintenance Manual, "Engine Oil Level - Check" for the correct procedure.


